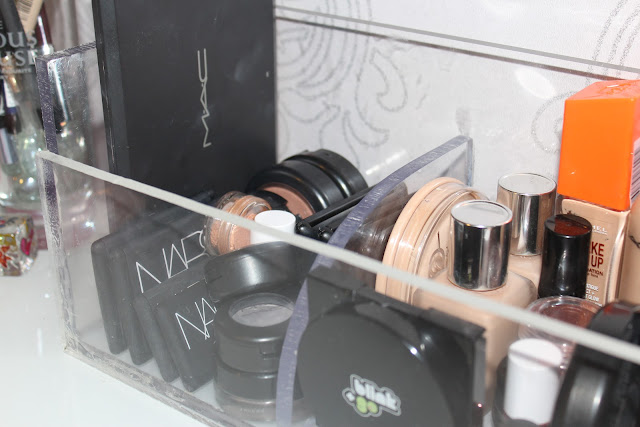
As you may be able too see from my recent posts, I have really been getting into DIY-ing, and making things on a budget!
I have wanted some acrylic storage to store some of my makeup in, but am reluctant to pay the (stupidly expensive) price of some of the pieces available on the internet. So, being a budget lover, I decided to give it a go myself and it actually ended up being super simple! My dad has a garage full of never ending diy bits, so I rummaged through there and found an old sheet of acrylic. (I think a sheet of acrylic costs around £30) I then measured all the bits out, and got him to cut them for me. All I did then was superglue it together....simple!
It may not be the most perfect looking piece of storage and there are slight errors in my measurements meaning some pieces are slight too big/small, have some glue showing here and there and slightly uneven surfaces, but it is pretty unnoticeable and it cost me the grand total of £0, so Im not complaining! I love how making your own storage means you can personalise it to your own needs, for example, I chose to have dividers in mine so as I could store different things in each section and have some sort of organisation.
I really love how acrylic looks and allows you to store your products out in view, with them still looking neat and tidy. It also really fits in with the decor of my bedroom, as my dressing table has a white glass finish to it.
So, another DIY post from me! I promise my next post will be a product review :)
Hope you enjoyed this and that it had inspired you to get DIY-ing!
Remember to enter my competition to win a £50 gift card to Simply Beach! You can enter by clicking here.
Lots of love


I love this! I think it's great you are so creative and thinking up ideas. I should have my Dad make this too! :)
ReplyDeleteThankyou! You should, definitely worth it! xx
DeleteI love this idea<3 It looks great!!
ReplyDeleteI think it would be perfect for nail polish too :)
MissJammyxo
Thankyou! Yeah it would look lovely with nail polish :)
Deletehi. i am following the friday blog hop. i would love for you to visit my blog and follow too.
ReplyDeletehttp://www.blackinkpaperie.blogspot.com
thanks
new follower bev
Thanks a lot! I am now following you too :)
DeleteGreat job... very creative! I am now following you! :)
ReplyDeletehttp://foxxybeauty.blogspot.com
Thanks a lot! Checked out your blog and following :) xx
DeleteVery nice idea for the lipsticks. have a nice Sunday :)
ReplyDeleteThanks lovely! You too :) xx
DeleteWOW, I can't believe you made this, it looks really good!
ReplyDeletexoxo
Hey there! I just found your cute blog via the hop and I'm your newest follower! I'd love to have you as my blog friend too, and invite you to a fabulous giveaway I'm having right now!!
ReplyDeleteHope to see you there! Thanks so much!
Emily
http://emilymmeyers.blogspot.com/2012/07/chi-bling-giveaway-winner.html
i been wanting something like this!
ReplyDeletegreat blog!
now following!
www.makeupbydulce.blogspot.com